Pages

Thursday, 31 July 2014

Homemade Sweetend Condensed Milk


Hello everyone, As we all know that Indian festivals have just started and the common thing among all the festivals is sweet :). Usually we purchase them from mithaiwalas but why not make them at home this time. Some easy and quick desserts with some Homemade condensed milk. Its supereasy to prepare and awesome in taste. There are few reasons that why I prefer this recipe, first of all its cheaper as compared to market, its fresh and have no preservatives. You can make it as per the quantity you need and no need to waste any. So lets quickly start up :)

Video Link :

Ingredients :
  • Whole milk : 500 ml
  • Sugar : 1 cup
  • Butter : 1 tbsp
  • Vanilla Essence : 1/2 tsp (optional)

Method :
  • Take a heavy bottom pan, add milk and sugar to it, mix well and let it boil on high flame.
  • Once boiled, reduce the flame to med to low and cook it for 10-12 minutes or unless it has started changing its colour and thickens a bit. Also don't leave it like this only, continuously stir it.
  • Once it achieves a little thick consistency (as shown in the video), switch of the flame and don't over thicken it. 
  • Now add the butter, to give a nice shine and also Vanilla essence (if adding).
  • Let it completely cool and store it in some airtight clean glass jar.
Notes:
  • You can adjust the amount of sugar as per your liking.
  • Stirring continuously is very important otherwise it might burn, also it might form some cream layer and you won't get a perfect texture.
  • Do not over thicken it, as once cooled it is going to become more thicker.
  • If suppose it thickens a lot, then no need to worry, just add a little more milk, whisk it well and warm it, it will be fine.
  • Store it in some air tight clean glass container and keep it refrigerated.
  • It will remain good for 15-20 days, but I would advice you to make it in small batches or as per the requirements.
  • In the end, don't forget to lick it from the pan ;)
Please do share your experiences and feedback with me in the below section of comments or on my Facebook page. I too have a You Tube channel please do visit for all the video recipes. All the links mentioned below :) 
Facebook : https://www.facebook.com/cookwithpriyanka

Thanks and Enjoy cooking
Priyanka :)


Friday, 25 July 2014

Cheese Buns/Stuffed Buns (Eggless)


Hello everyone, today I have got for you all a very yummy recipe of Stuffed buns. I used to have them during my school time, stuffed with masala potaotes. So just thought to prepare them with Paneer and cheese filling. The result was just awesome. This is a great snack, either with tea or coffee, we had it with freshly squeezed orange juice and is a huge hit in my house.


Preparing them is a bit lengthy process but at the same time they are very easy to prepare. The best part is that you can stuff them up with any filling you like be it Vegetarian or non vegetarian or may be the left overs. They have a very nice crust and very soft inside. You can make them in large numbers in advance or freeze them, microwave them for 15 secs and they will be fresh again. They are an awesome idea for pot lucks too :))))
So without wasting much of the time lets dive into the ingredients following the method.


Video Link :
 
Ingredients :

For the dough :
  • All purpose flour : 2 cups
  • Dried active Yeast : 1 tbsp (If using instant yeast then take 2+1/4 tsps)
  • Sugar 1 tbsp
  • Luke warm water : 1/2 +1/2 cup
  • Butter : 1+1/2 tbsps  (melted)
For the stuffing :
  • Onion : 1 small finely chopped
  • Red Bell pepper : 1/2 finely chopped
  • Green Bell pepper : 1/2 finely chopped
  • Garlic : 2-3 cloves finely chopped
  • Paneer/cottage cheese : 1cup finelydiced
  • Cheese (any) : 1 cup (You can adjust the quantity)
  • Oregano : 1 tsp
  • Chilli flakes : 1 tsp
  • Salt : As per the taste (add a little less as cheese also contains salt)
  • Oil : 1-2 tbsps
Method :
Activate the yeast :
  • In a bowl take 1/2 cup of luke warm water. To this add yeast and sugar,  mix well, cover and keep aside for 10-15 minutes or unless yeast becomes foamy or frothy.
  • If you are using Instant yeast, then skip this step and add yeast and sugar directly to the flour and knead with warm water.
Make the dough :
  • Once yeast activated, take All purpose flour, add salt, mix well, add yeast mixture and try to knead a dough.
  • Also add the rest half of the luke warm water, little by little and knead a very sticky dough. Half way through add 1 tbsp melted butter and knead.
  • As shown in the video, take the dough on to the working surface and knead atleast for 10-12 minutes. This will activate some gluten in the dough, which helps to make the buns light and soft. You might need some dry flour and butter to make it smooth. But don't add a lot of dry flour or it will become dense.
  • Once done with the kneading, place it in a well greased bowl and apply some oil on the top as well. Cover it and keep it in some warm place so that it rises well. I kept it in my oven, switching on only light and not the oven. It takes 45 minutes to 1 hour or sometimes more than that, as per the whether.
Make the stuffing :
  • In a pan, take some oil, to this add garlic and saute, then add onions and again saute unless they are golden, then add bell peppers and saute for 1-2 minutes. Now add the paneer, also add the chilli flakes, oregano and salt. Mix well and cook fora minute more. Keep aside to cool.
  • Once cooled, add the cheese and mix.
Second proofing of the dough :
  • Once doubled, take out the dough on the work surface, deflate it and roll it to a rectangular blog of same thickness, with the help of your palms.
  • Cut the dough into six equal parts.
  • Take each part and form a ball, as shown in the video.
  • Keep these balls with some distance, apply some oil, cover and let them rise again. This will again take 40 minutes to 1 hour.
Stuffing the buns :
  • Once balls are doubled in size, stuff them with the filling and close them. Try to pinch them nicely so that they don't open while baking.
  • Keep all the stuffed balls on a baking tray lined with parchment paper/butter paper or aluminum foil. 
  • Cover them and rest them again for 15-20 minutes. 
  • In the mean while preheat the oven at 220° Celsius.
Baking the buns :
  • Once rested, apply some milk with brush, for nice shine and bake them for 20-25 minutes.
  • Also keep an oven proof dish filled with a cup of boiling water in the lower rack to create steam. This helps in forming nice crust.
  • Mine were exactly for 22 minutes.
  • After taking them out, put them on a cooling rack and apply some butter.
    Let them cool a bit.
Enjoy!!!!

Note :
  • Yeast is a main hero of the recipe so if it doesn't froth nicely, throw away the mixture, check the yeast expiry date and start with fresh.
  • Never skip the dough kneading part, this makes the bun softer.
  • You can always play with filling part, as per you taste preferences.
  • Proof them twice, as told in the recipe.
  • You can also apply some egg wash instead of milk. 

Please do share your experiences and feedback with me in the below section of comments or on my Facebook page. I too have a You Tube channel please do visit for all the video recipes. All the links mentioned below :) 

Thanks & Happy Baking
Priyanka


Monday, 21 July 2014

Mango Shrikhand

Mangoes are my all time favorite. But being in London have very limited access to Asian Mangoes. Found some this weekend, had few like this only and rest planned to make some dessert. 


Its very hot here, I can very well understand the heat in India. So made some Mango Shrikhand, its very light & refreshing dessert. Flavored it only with mangoes and didn't add cardamom or kesar, as just wanted to highlight mango in it. 


Its very easy and quick recipe, also very well prepared in advance, just refrigerate and serve chill. I prepared it with mangoes, but you can add any sweet fruit, dry fruits or even chocolate. So without wasting any of the time, lets quickly run through the ingredients, following the method.

Video Link :

Ingredients :
  • Hung curd/ very thick yogurt : 1 cup
  • Mango Puree : 1/2 cup
  • Powdered sugar : 1/4 cup (adjust as per the taste and mango)
  • Pistachios : 1 tbsp for garnishing
Note: the video ingredients may vary, but I have used the same ratio made it a bit easy.

Method :
  • Beat the yogurt/curd with the help of a spatula or a spoon (please don't use a blender or whisk otherwise you will loose its consistency)
  • Add in powdered sugar and Mango puree and mix well.
    Fold in some pistachios and leave some for garnishing.
  • Serve it in a glass or a bowl, pour some mango puree on top and garnish it with some pistachios.
Enjoy!!!!

Note:
  • For hung curd - put the yogurt/curd on a sieve over a bowl. Put it inside fridge overnight. Morning you will see that the excess water is drained in the bowl and you are left with thick curd.
  • If you see any lumps, then pass the mixture through a sieve and it will be fine.

Please do share your experiences and feedback with me in the below section of comments or on my Facebook page. I too have a You Tube channel please do visit for all the video recipes. All the links mentioned below :) 

Thanks & Happy Cooking
Priyanka

Thursday, 17 July 2014

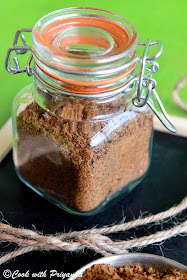
Homemade Garam Masala (All spice powder)


Garam Masala is a very common and important spice blend in any Indian household. I have seen my grand mother preparing it, then my Mother and now me. I am preparing this since a long time and very very satisfied with the taste and aroma both. 


We get it very easily in market but taste is never guaranteed. There are various recipes for Garam Masala but I am following my Mother's recipe to the T.


There are many spices involved in this, many recipes include coriander seeds as well, but I prefer to add coriander separately in my gravies, hence don't add. I make it in small batches for a month only, this way it remain fresh. It hardly takes much time to prepare. If you are making it in a big batch then off-course you can, just store it in small airtight containers. Usually when I was in India, I used to keep them in strong sunlight for an hour or two and then used to grind them. But here in London I dry roast them due to lack of sunlight.


Adding a little of it to any curry or gravy takes it to another level. So lets quickly see the ingredients following the method.

Ingredients :
  • Cumin Seeds : 1.5 tbsps
  • Caraway seeds/shahi jeera : 1 tbsp
  • Cloves : 1 tbsp
  • Bay leaves : 6-7
  • Green Cardamom : 1 tbsp (25 approx)
  • Black Cardamom : 6
  • Black Pepper corns : 1 1/2  tbsps (you can adjust it)
  • Nutmeg : 1/2 
  • Star anise : 2 small (optional)
  • Cinnamon Sticks : 4-5 of 3" each
  • Mace/Javitri : 2-3
Method :
  • Dry roast all the ingredients or keep them in strong sunlight for couple of hours.
  • Now let them cool and grind them to a fine powder.
  • Store in an airtight container.
Note :
  • If you want to add coriander seeds to it, then simply add 1/4 cup of coriander seeds to this ratio.
  • If you are adding grated nutmeg, then no need to dry roast it, simply add it in the end and mix well.
Enjoy!!!!!!


Please do share your experiences and feedback with me in the below section of comments or on my Facebook page. I too have a You Tube channel please do visit for all the video recipes. All the links mentioned below :) 
Facebook : https://www.facebook.com/cookwithpriyanka

Thanks & Happy Cooking
Priyanka

Friday, 11 July 2014

Kadai Paneer - Restaurant style


Hello everyone, today I have got a recipe of Kadhai Paneer, one of my favourite dishes. Whenever I am visiting any restaurant or dhabas I never ever forget to order this. 


I tried so many recipes but not at all satisfied with the results, was not getting that restaurant flavours, thus never posted its recipe too. Then one day Jaspreet Nirula ji's  recipes clicked in my mind, he is one of my foodie friend and a very awesome cook, specially in rich cuisines, was pretty sure that he might have the solution for it too. I asked him and got a brilliant recipe. Tried it and simply loved it too. Made very minimal changes and finally very happy. Its a bit time taking recipe but believe me, its worth. So today I am dedicating my post to him. Thank you sir :)))))
So lets run through the ingredients, following the method.

Video Link :


Ingredients :
  • Paneer/Cottage cheese : 200gms (Click here for the homemade paneer recipe)
  • Tomatoes : 3 medium, chopped
  • Onion : 1 small, diced
  • Capsicum/bellpeppers : 1 medium, diced
  • Fried onion paste - 1 onion (Fry in oil, blend it with a little water)
  • Ginger : 1/2 tsps
  • Garlic : 1+1/2 tsps
  • Green chillies : 2 slit
  • Kashmiri red chili powder : 1 tsp
  • Kadai Masala : 2 tsps (Click here for homemade Kadai Masala recipe)
  • Garam Masala : 1/4 tsp
  • Kasoori Methi/Dried fenugreek leaves : 1 tbsp
  • Fresh Cream : 1/2 cup (optional, I didn't add)
  • Oil : 3-4 tbsps 
  • Salt to taste
 Method :
  • Heat 1+1/2 tbsps of oil in a pan, fry the paneer cubes till light golden in colour. Once done put them in warm water with some salt.
  • In the same pan fry the diced capsicum and diced onions, maintain their crunchiness. Take them out on a plate and keep aside.
  • In the same pan add a oil (approx 1tbsp), add 1 tsp of garlic and saute. Now add the chopped tomatoes to it and fry until they are half done. 
  • Add red chili powder with 1/2 tsp salt and cook further. When oil oozes out and the tomatoes masala is cooked properly switch off the flame and keep aside.
  • In a wok/kadai add some oil, to this add 1/2 tsp of ginger and 1/2 tsp of garlic and saute. Add 1+1/2 tsps kadai masala and fry. Then add green chillies and also add the fried onion paste. Mix it well, we don't have to cook it as its already cooked.
  • Now add the tomato masala with some water (amount of water depends upon the consistency of gravy you want) and cook for a couple of minutes. 
  • Add the sauteed capsicum & onions and also the drained paneer cubes, mix well.
  • Finally add garam masala , 1/2 tsp of kadai Masala and kasoori methi and mix well.
  • If you are adding cream, add it, cover for 2-3 minutes and cook on low flame. 
  • Serve with hot chapatis, Rumalis (click here for Rumali roti recipe), laccha paratha.
Enjoy!!!!!!


Please do share your experiences and feedback with me in the below section of comments or on my Facebook page. I too have a You Tube channel please do visit for all the video recipes. All the links mentioned below :) 
Facebook : https://www.facebook.com/cookwithpriyanka

Thanks & Happy Cooking
Priyanka


Thursday, 10 July 2014

Homemade Kadai Masala Powder


Hello everyone, today I have you all a recipe of Kadai masala powder. Its very well used in various kadai preparations whether vegetarian or non-vegetarian. You can make this and store in an air tight container for 2-3 months. 

Video link :


Ingredients :
  • Coriander seed : 1 tbsp
  • Black pepper corn : 1/2 tsp
  • Cumin seeds : 1 tsp
  • Whole red chillies : 2-3
  • Cloves : 4-5
  • Green cardamom : 2-3
  • Black cardamom : 1
  • Cinnamon stick : 1/2 " stick
  • Bay leaves : 1-2

Method :
Dry roast all the ingredients on a low flame. Once you start getting the aroma and the spices are done, coarsely grind them in a spice grinder as shown in the video. Store it in an air tight container.

Please do share your experiences and feedback with me in the below section of comments or on my Facebook page. I too have a You Tube channel please do visit for all the video recipes. All the links mentioned below :) 
Facebook : https://www.facebook.com/cookwithpriyanka

Thanks & Happy Cooking
Priyanka

Wednesday, 2 July 2014

Eggless lemony blueberry muffins with crumble topping


Hello everyone, today I will be showing you all that how to prepare Lemony blueberry muffins with crumble topping. They are crunchy outside and very moist and soft inside. At the same time they are eggless too. Lemon has given a nice kick and took them to the next level, though its not overpowering at all. You can have them with a cup of coffee or just like that as a dessert.


I made these cupcakes specially for my younger little sisi (Sister), Its her Birthday today and also she got selected as a Probationary officer in Bank of Baroda hence wanna wish her with lots of love and wishes. She really made us proud :))))


So without wasting any of the time, lets quickly run through the ingredients following the method.

Here is the video link :


Ingredients : 
As usual, I have divided the ingredients list in two parts- the dry & wet ingredients. This way it will be easy for you to follow. 
Dry ingredients:
  • All Purpose flour/Maida/Plain flour : 1 + 1/2 cups
  • Baking Powder : 1 + 1/2 tsps
  • Baking Soda : 1/2 tsp
  • Salt : 1/4 tsp
  • Blueberries : 3/4 cup
Wet ingredients : 
  • White granulated sugar : 3/4 cup
  • Thick Yogurt : 1/2 cup (at room temperature)
  • Vegetable Oil : 1/4 cup 
  • Lemon zest : 1 tsp
For the crumble topping :
  • All purpose flour : 1/2 cup
  • Sugar : 1/4 cup
  • Chilled butter : 3 tbsps
  • Lemon zest : 1/2 tsp
Method :
  • First preheat the oven at 180°C. Line the muffin tray with liners or simply grease them with some oil or butter.
  • Sieve the dry ingredients together atleast 3 times and keep aside, this give more aeration to the flour and helps in making the cake light.
  • Coat the berries with a couple of tbsps of flour, this will prevent them from sinking to the bottom.
  • In other bowl mix sugar + yogurt and whisk, you will get a very nice texture. To this add oil and lemon zest, mix well. 
  • After they are well combined add the dry ingredients in two batches and fold in gently. Don't overmix, just make sure all the ingredients are well combined. Also add the blueberries and fold in gently.
  • Pop the batter in molds.
  • Prepare the crumble topping - mix together flour, sugar and zest. Then with the help of a fork mix in the chilled butter and form a breadcrumbs textured mixture. Sprinkle it a tbsp on each of the muffin (As shown in the video).
  • Bake it on the middle rack for 20-25 mins or unless a tooth pick inserted comes out clean. Mine took exactly 25 minutes. But keep checking after 18-20 minutes as every oven vary as per the power.
  • When done, take it out and give a rest of 5 minutes in the tin, then demold and cool on a cooling rack.
Enjoy !!!!!!

Note :
If using eggs, then replace 1/4 cup of yogurt with one egg, also omit baking soda.

Please do share your experiences and feedback with me in the below section of comments or on my Facebook page. I too have a You Tube channel please do visit for all the video recipes. All the links mentioned below :) 

Thanks & Happy Baking
Priyanka :)

Tuesday, 1 July 2014

Vermicelli upma/Vegetable Semiya


I am an egg lover and try to have them daily in my breakfast menu but we eat total veg on Mondays & Tuesdays, hence try to prepare some special breakfast for these days, so that it can compensate those missing eggs. Vermicelli upma or Namkeen semaiya is always a yes in my home. It is a very traditional South Indian breakfast too and made with lots many varieties.  It requires very little effort and tastes delicious. And best of all, my family loves it. I love its texture and have it with lots of veggies and lime juice. Sometimes with coconut or tomato chutney. I still remember those lazy weekends at my mom's place, when everyone used to sit together and had this in breakfast. So lets see the ingredients following the method.

Ingredients :
  • Vermicelli/Semiya : 2 cups (I used Bombino)
  • Onions : 1 large (finely sliced)
  • Green Chillies : 1-2 slit (or as per the taste)
  • Carrots : 1/2 cup (finely chopped)
  • Peas : 1/2 cup (Frozen/fresh)
  • Potato : 1 medium (Finely chopped)
  • Tomatoes : 2 medium (optional)
  • Chili powder : 1 tsp (optional)
  • Mustard seeds : 1 tsp
  • A Sprig of curry leaves
  • Peanuts : 1/4 cup
  • Oil : 2 tbsps
  • Salt : As per the taste 
  • Lime juice : 2 tbsps (or as per the taste)

Method :
  • Dry roast the vermicelli in a pan on low flame. Stir continuously till you get the aroma and a very light golden color. If you are using already roasted ones, then you can skip this step. 
  • If adding peanuts, roast them and keep aside. I usually dry roast my peanuts in microwave for 4-5 minutes (depends on the quantity). You can also fry them in oil.
  • Heat 8 cups of water in a big pan, add some salt. As soon as the boil comes add roasted vermicelli to it and switch off the gas. Keep an eye, as soon they are done (you can check by braking them with fingers) strain them in a sieve.
  • Simultaneously, heat oil and add mustard seeds, let them splatter, then add curry leaves and green chillies.
    Now add onions and saute a bit, then add carrots & potato, saute, cover it with a lid and let it cook. If you are using fresh peas add with carrots only as frozen ones can be added later with tomatoes.
  • Add finely chopped tomatoes, chili powder, salt and cook. Once tomatoes are little soften, add strained vermicelli and mix. Add lime juice, peanuts and serve hot.

Notes:
  • Try to boil the vermicelli and fry the veggies simultaneously, as after boiling and keeping the vermicelli for long makes them a bit sticky. If there is a situation where you need to keep them for long, then spread them on a tray and apply some oil gently. 
  • Adding tomatoes and red chili powder is optional, but I like the taste hence add them.
  • You can add as many veggies you like and also adjust their quantities as per you likings.
Please do share your experiences and feedback with me in the below section of comments or on my Facebook page. I too have a You Tube channel please do visit for all the video recipes. All the links mentioned below :) 
Facebook : https://www.facebook.com/cookwithpriyanka

Thanks & Happy cooking
Priyanka :)