Ad1

Showing posts with label Vegetarian. Show all posts

Friday, 11 July 2014

Kadai Paneer - Restaurant style


Hello everyone, today I have got a recipe of Kadhai Paneer, one of my favourite dishes. Whenever I am visiting any restaurant or dhabas I never ever forget to order this. 


I tried so many recipes but not at all satisfied with the results, was not getting that restaurant flavours, thus never posted its recipe too. Then one day Jaspreet Nirula ji's  recipes clicked in my mind, he is one of my foodie friend and a very awesome cook, specially in rich cuisines, was pretty sure that he might have the solution for it too. I asked him and got a brilliant recipe. Tried it and simply loved it too. Made very minimal changes and finally very happy. Its a bit time taking recipe but believe me, its worth. So today I am dedicating my post to him. Thank you sir :)))))
So lets run through the ingredients, following the method.

Video Link :


Ingredients :
  • Paneer/Cottage cheese : 200gms (Click here for the homemade paneer recipe)
  • Tomatoes : 3 medium, chopped
  • Onion : 1 small, diced
  • Capsicum/bellpeppers : 1 medium, diced
  • Fried onion paste - 1 onion (Fry in oil, blend it with a little water)
  • Ginger : 1/2 tsps
  • Garlic : 1+1/2 tsps
  • Green chillies : 2 slit
  • Kashmiri red chili powder : 1 tsp
  • Kadai Masala : 2 tsps (Click here for homemade Kadai Masala recipe)
  • Garam Masala : 1/4 tsp
  • Kasoori Methi/Dried fenugreek leaves : 1 tbsp
  • Fresh Cream : 1/2 cup (optional, I didn't add)
  • Oil : 3-4 tbsps 
  • Salt to taste
 Method :
  • Heat 1+1/2 tbsps of oil in a pan, fry the paneer cubes till light golden in colour. Once done put them in warm water with some salt.
  • In the same pan fry the diced capsicum and diced onions, maintain their crunchiness. Take them out on a plate and keep aside.
  • In the same pan add a oil (approx 1tbsp), add 1 tsp of garlic and saute. Now add the chopped tomatoes to it and fry until they are half done. 
  • Add red chili powder with 1/2 tsp salt and cook further. When oil oozes out and the tomatoes masala is cooked properly switch off the flame and keep aside.
  • In a wok/kadai add some oil, to this add 1/2 tsp of ginger and 1/2 tsp of garlic and saute. Add 1+1/2 tsps kadai masala and fry. Then add green chillies and also add the fried onion paste. Mix it well, we don't have to cook it as its already cooked.
  • Now add the tomato masala with some water (amount of water depends upon the consistency of gravy you want) and cook for a couple of minutes. 
  • Add the sauteed capsicum & onions and also the drained paneer cubes, mix well.
  • Finally add garam masala , 1/2 tsp of kadai Masala and kasoori methi and mix well.
  • If you are adding cream, add it, cover for 2-3 minutes and cook on low flame. 
  • Serve with hot chapatis, Rumalis (click here for Rumali roti recipe), laccha paratha.
Enjoy!!!!!!


Please do share your experiences and feedback with me in the below section of comments or on my Facebook page. I too have a You Tube channel please do visit for all the video recipes. All the links mentioned below :) 
Facebook : https://www.facebook.com/cookwithpriyanka

Thanks & Happy Cooking
Priyanka


Friday, 20 June 2014

Veg Pulav/Pilaf with Soyabean Chunks


Hello Everyone, today I got a vegetarian Pulav recipe for you all. Its perfect alternative for biryanis, very delicious and my all time favourite. Its my mother's recipe and she used to prepare it with just whole spices (Garam Masala), which are all mostly dark colored with rice so while we were kids we used to call it "black & white pulav". She used to add soyabean chunks which were like cherry on the cake. Some times she also added jack fruit to it but only during its season. Its a super easy recipe and always a hit in my house. Sushant loves to eat it with just plain curd and homemade aam ka achar. So without wasting much of the time here you go with the ingredients following the method.


Ingredients :

  • Basmati rice/Any long grain rice : 1 cup
  • Soya chunks : 3/4 cup
  • Onions : 1 cup thinly sliced
  • Cumin Seeds : 1 tsp
  • Bay leaves : 2 nos
  • Cloves : 4-5
  • Cinnamon stick : 1 large size
  • Black Cardamom : 2 big or 3 small sized
  • Green Cardamom : 4 nos
  • Mace : 1 small sized
  • Star Anise : 1 nos (optional)
  • Black Peppercorns : 1 tbsp (Coarsely crushed)
  • Whole red chillies : 2-3  
  • Oil : 2-3tbsps
  • Salt : As per the taste
  • Water : 2 cups (appx)
Method :
  • Soak rice in water for 10 minutes. Drain the water completely and keep it aside.
  • Soak soya chunks in salted boiling water for 10-15 minutes. Once soaked properly, squeeze them and keep aside.
  • Now, in a pressure cooker heat oil, when its medium hot add cumin seeds, let it crackle, add cinnamon stick, bay leaves, both cardamoms, cloves, star anise, mace, whole red chillies. Let them saute for few seconds, let them release their flavours. Then add thinly sliced onions and fry till they are golden brown. 
  • Once done add crushed peppercorns and soya chunks, mix well and saute for a minute. 
  • Add drained rice and salt (I used 2 tsp), give it a gentle mix and finally add water (I added 1+3/4 cups), it varies as per the variety of rice, usually it takes double the amount of rice. Let it come to a boil, close the lid with weight, let the flame be on high. 
  • As soon as you get the first whistle lower the flame to low and cook for another 4-5 minutes. 
  • Switch of the flame and let the pressure completely subside. 
  • Open the cooker, let it sit for couple of minutes, then gently mix with a fork and serve.
Enjoy it with plain yogurt, pickled onions or mango pickle.

Please do share your experiences and feedback with me in the below section of comments or on my Facebook page. I too have a You Tube channel please do visit for all the video recipes. All the links mentioned below :) 
Facebook : https://www.facebook.com/cookwithpriyanka

Thanks & Happy Cooking
Priyanka

Wednesday, 11 June 2014

Homemade Sambhar Powder/Sambhar Podi


Hello everyone, today I got you all a recipe which is common in every household, specially in South Indian houses. There are various ways to prepare podi, I am sharing my mother's recipe which she got it from her mother, so kind of a generation pass on :). 


For those who are new to sambhar, I would like to tell them that Sambhar is a popular South Indian gravy, made with lentil and veggies. Few spices are blended together and used as sambhar powder. This Sambhar powder is use to make Sambhar. Usually we get sambhar powder very easily in markets, but they are not very fresh, neither they have that taste.

I always make podi in small batches and store them in either ziplock bags or air-tight containers. Making them in small batches retain their freshness and once finished you can make your second batch in no time. You can use it for many other variants like sambhar rice, sambhar chicken and the variants go on.......
So lets quickly run through the ingredients following the method :)


Ingredients :
  • Urad dal - 2 tbsps
  • Chana dal - 2 tbsps
  • Tuar dal - 2 tbsps
  • Coriander Seeds - 6 tbsps
  • Whole Red chillies - 10-15 nos
  • Fenugreek Seeds - 1/2 tbsps
  • Pepper corns - 1 tbsp
  • Cumin seeds - 1 tbsp
  • Mustard seeds - 1/2 tbsp
  • Dried curry leaves - 15-20
  • Asafoetida/Hing - 1/8 tsp
Method :
Dry roast all the ingredients except Hing, in a pan (on medium to low flame) with continuous stirring. Once you start getting a nice aroma of all the spices, switch of the flame and let it cool. Once cooled grind them + Hing to make a fine powder. Store in air-tight containers.

Note :
You can adjust the chillies as per the taste buds.
Sometimes when my chillies don't gives a nice reddish colour then I add kasmiri lal mirch too for the colour.
If you like you can dry roast the dals and spices seperately, but I do it all together to save time :)

Enjoy your fresh sambhar and idlis or dosai :)

Please do share your experiences and feedback with me in the below section of comments or on my Facebook page. I too have a You Tube channel please do visit for all the video recipes. All the links mentioned below :) 
Facebook : https://www.facebook.com/cookwithpriyanka

Thanks & Happy Cooking 
Priyanka :)

Wednesday, 4 June 2014

Rumali Roti (Thin Flatbread)


Hello everyone, today on public demand I got you all the recipe of Rumali Rotis. These are very-very thin just like handkerchiefs thus named rumali roti. Traditionally they are made large size and cooked on an upside down wok (made up of clay). Mostly enjoyed with Tandoori & Muglai cuisines, but for us its just not the case. We have it with any masala curry we prepare. This roti has both flours All purpose flour (maida) & Whole wheat flour (Atta). It goes well with any  vegetarian or  non vegetarian curry. Usually in Restaurants, chef flip the rolled dough in air to make thinnest possible stuff, but learning that technique is not very easy. I tried it, but failed and got a roti with so many holes. So I have started preparing it on a pan and viola !!!! the results are almost the same. So here is a very simple and easy to follow recipe.

Video Link - 
Ingredients :
  • Whole wheat flour/Atta - 1/2 cup
  • All purpose flour/Maida - 1/2 cup
  • Rice flour - 2 tbsps
  • Oil/ghee - 2 tbsps
  • Water - to knead the soft dough
Method :
  • Mix both the flour well and with water knead a very soft dough. Cover with a damp kitchen towel and keep aside for 15-20 minutes.
  • Make 2 small sized balls of the dough.
  • Roll out both of them half way through or 4-5" diameter.
  • Now apply some oil on one of the rolled roti and sprinkle rice flour.
  • Cover it with the other rolled roti and press gently.
  • Roll out the sandwiched rotis together to a large thin roti (As per your griddle/tawa size) using a little dry flour.
  • Heat a tawa on high flame and cook this roti on both sides very quickly (as shown in the video), be very fast.
  • Remove from tawa and immediately separate the 2 rotis.
  • Fold each roti into a triangle and keep soft in a casserole or a big bowl placing some paper towels below and covering with a damp cloth (This helps in maintaining them soft).
  • Enjoy with either vegetarian or non-vegetarian cuisines. 
Note :
  • If rice flour not available then all purpose flour can also be used.
  • You can add a couple of tbsps of oil while kneading the dough (I usually don't add) 
  • Also for more better results, knead the dough with milk.
  • The dough should be very soft, otherwise the roti will become very hard.
  • The griddle/tawa should be very hot and you hae to be very fast while cooking them. 
Please do share your experiences and feedback with me in the below section of comments or on my Facebook page. I too have a You Tube channel please do visit for all the video recipes. All the links mentioned below :) 
Facebook : https://www.facebook.com/cookwithpriyanka


Thanks & Happy Cooking
Priyanka :)))


flip the dough balls in air to make the thinnest possible roti. - See more at: http://www.foodcnr.com/2013/09/roomali-roti-rumali-roti.html#sthash.PhAc3c7p.dpuf

Tuesday, 20 May 2014

Banana & Walnut Cake (Eggless)


Hi all, recently upgraded to a DSLR (finally!!!!!!) and also crossed my 1500 likes on Facebook page, so double celebrations time. Hence thought to prepare some sweet and therefore prepared Banana & walnut cake. Being baking a new passion, I always try to get more eggless recipes as these can be followed by both non-vegetarian and vegetarian friends :))))


Its just two days I got my new camera and working on it. Goshh!!!!!!! its so difficult & complicated to work with, but I am pretty sure will overcome it and share upgraded pics soon with you guys.


Talking about the cake now ;), its supermoist as I used oil and yoghurt, Its light & spongy. Full of flavours of Banana, cinnamon. As coffee enhances the flavor of chocolate in the same manner cinnamon also enhances the flavour of banana. I have used the over-ripped bananas here (those which have large black spots on the skin). Actually these bananas are more sweeter and gives very nice flavour to cakes, smoothies. So no more throwing of those dark colored bananas :)). Walnuts & bananas are a great combination together, walnut gives a very nice crunch to the cake. So guys with so many goodness why are we waiting then ????? Lets quickly run through the ingredients following the method :))))

Video :-


Ingredients :
I have divided the ingredients list in two parts- the dry & wet ingredients. This way it will be easy for you to follow.
Dry ingredients: 
  • All Purpose flour/Maida/Plain flour - 1 cup
  • Baking Powder - 1 tsp
  • Baking Soda - 1/2 tsp
  • Cinnamon Powder - 1/4 tsp
  • Salt - a generous pinch
  • Walnuts - 1/4 cup (roughly chopped)
Wet ingredients :

  • Brown sugar - 1/2 cup
  • White granulated sugar - 2 tbsps
  • Thick Yogurt - 1/4 cup (at room temperature)
  • Vegetable Oil - 1/4 cup 
  • Banana - 2 medium sized (overripped)
  • Vanilla Essence - 1 tsp (optional- I didn't add it)
Method :
  • First preheat the oven at 180°C. Grease & flour the baking tin, if you want, line with parchment paper/Butter paper.
  • Sieve the dry ingredients together atleast 3 times and keep aside, this give more aeration in the flour and helps in making the cake light.
  • Now mix in a couple of tbsps of flour with the walnuts and coat well, this will prevent sinking walnuts. Keep aside.
  • In other bowl mix oil + sugar + yogurt + Vanilla essence (if adding). Also add mashed bananas. After they are well combined add the dry ingredients and fold in gently. Also add the flour coated walnuts.
  • Pour the batter in tin.
  • Bake it on the middle rack for 40-50 mins or unless a tooth pick inserted in the cake comes out clean. Mine took exactly 45 minutes. But keep checking after 35 minutes as every oven vary as per the power :)
  • When done, take it out and give a rest of 2 minutes in the tin, then demold and cool on a cooling rack.
  • Once completely cooled, cut into slices and these can be stored in an air tight container for 3-4 days. You can also enjoy it my way - warm slice with vanilla ice cream :)) 
Note : 
  • If you don't have brown sugar simply replace it with white one. 
  • You can omit cinnamon if that's not your taste. You can add green cardamom powder instead.
  • You can adjust the amount of sugar as per the sweetness of bananas or your taste.
  • Also you can adjust the walnuts quantity as per the liking, or completely omit it. 
Please do share your experiences and feedback with me in the below section of comments or on my Facebook page. I too have a You Tube channel please do visit for all the video recipes. All the links mentioned below :) 


Thanks & Happy Baking
Priyanka :)))

Friday, 16 May 2014

Oatmeal, raisins & choco chips cookies (Eggless & with eggs both version)


Oatmeal cookies are not new in our home as its liked by everyone hence an all time favourite snack for our family. Secondly its healthy too :). I have prepared them with & without eggs and frankly speaking didn't find much difference. They are crunchy outside and chewy inside. Have a nice buttery flavour with a sweetness of raisins & chocolate. I also add cinnamon powder to it as its my one of the favourite flavours, its totally optional but I must admit that it takes cookies to the next level :))))


Tomorrow I am planning to meet one of my foodie friend, so just thought to bake something for him. Made few goodies and will upload soon. The one thing which I thought to prepare first were these, as I am pretty sure it will be loved :). Presenting a food goodie to a foodie friend is quite tough na........But making my fingers crossed, I have packed them. 


They are very easy to prepare and have a longer shelflife. These can be stored in an airtight containers for a longer time. Having one cookie with a cup of milk is very healthy and believe me kids just love it. Once I prepared it for my niece and she became crazy for them, used to have them in her breakfast without any fuss, she is just 4 :))))). So lets quickly run through the ingredients following the method :)

I am also posting here a video for an eggless version, so all my vegetarian friends can see it. I didn't add chocolate chips in this version, if you like you can add 1/4 cup of chocolate chips too. 

Ingredients :
  • Rolled oats - 1 + 1/2 cup (Old fashioned or quick any can be used)
  • All purpose flour/Maida/ Plain flour - 3/4 cup
  • Light Brown Sugar - 1/2 cup packed
  • Castor sugar - 1/4 cup
  • Butter - 1/2 cup (at room temperature)
  • Egg - 1 nos 
  • Vanilla essence - 1/2 tsp
  • Baking Soda - 1/2 tsp
  • Salt - 1/2 tsp
  • Cinnamon Powder - 1/4 tsp (optional)
  • Raisins - 1/2 cup
  • Choco chips - 1/4 cup
Method :
  • Preheat your oven at 180 ° C/350 ° F
  • In a big bowl beat butter till fluffy & light. 
  • Now add both the sugars and continue beating till mixed well and the mixture becomes fluffy.
  • Now add one egg and vanilla essence.
  • In a separate bowl sift & whisk all the dry ingredients - All purpose flour + Baking Soda + Cinnamon powder + Salt.
  • Fold in the dry ingredients to the wet (butter mixture)
  • Incorporate oats + raisins + choco chips.
  • Place the cookies with the help of ice cream scoop or spoons on the baking tray lined with parchment paper/aluminum foil.
  • Bake them on the middle shelf for 17-20 minutes. If you like your cookies to be more chewer and not very much crispy then bake them till 15 minutes only. 
  • Take them out, let them rest for 5 minutes on the baking sheet. Later transfer them to a cooling rack and let them completely cool for atleast an hour. Once cooled store them in an air tight jar.
Note : 
  • I have used brown sugar, but if its not available then you can use normal white granulated sugar too. If you can grind the sugar then that will also work great.
  • Once baked, cookies tend to get bit harder when comes in contact with air. So don't panic if they are soft on touching after 15-17 minutes.
  • Adding raisins & choco chips is totally up to your choice.
Enjoy with your family & friends :)


Do share your experiences and feedback with me in the below section of comments or on my Facebook page. I too have a You Tube channel please do visit for all the video recipes. All the links mentioned below :)


Thanks & Happy Baking 
Priyanka :) 

Thursday, 15 May 2014

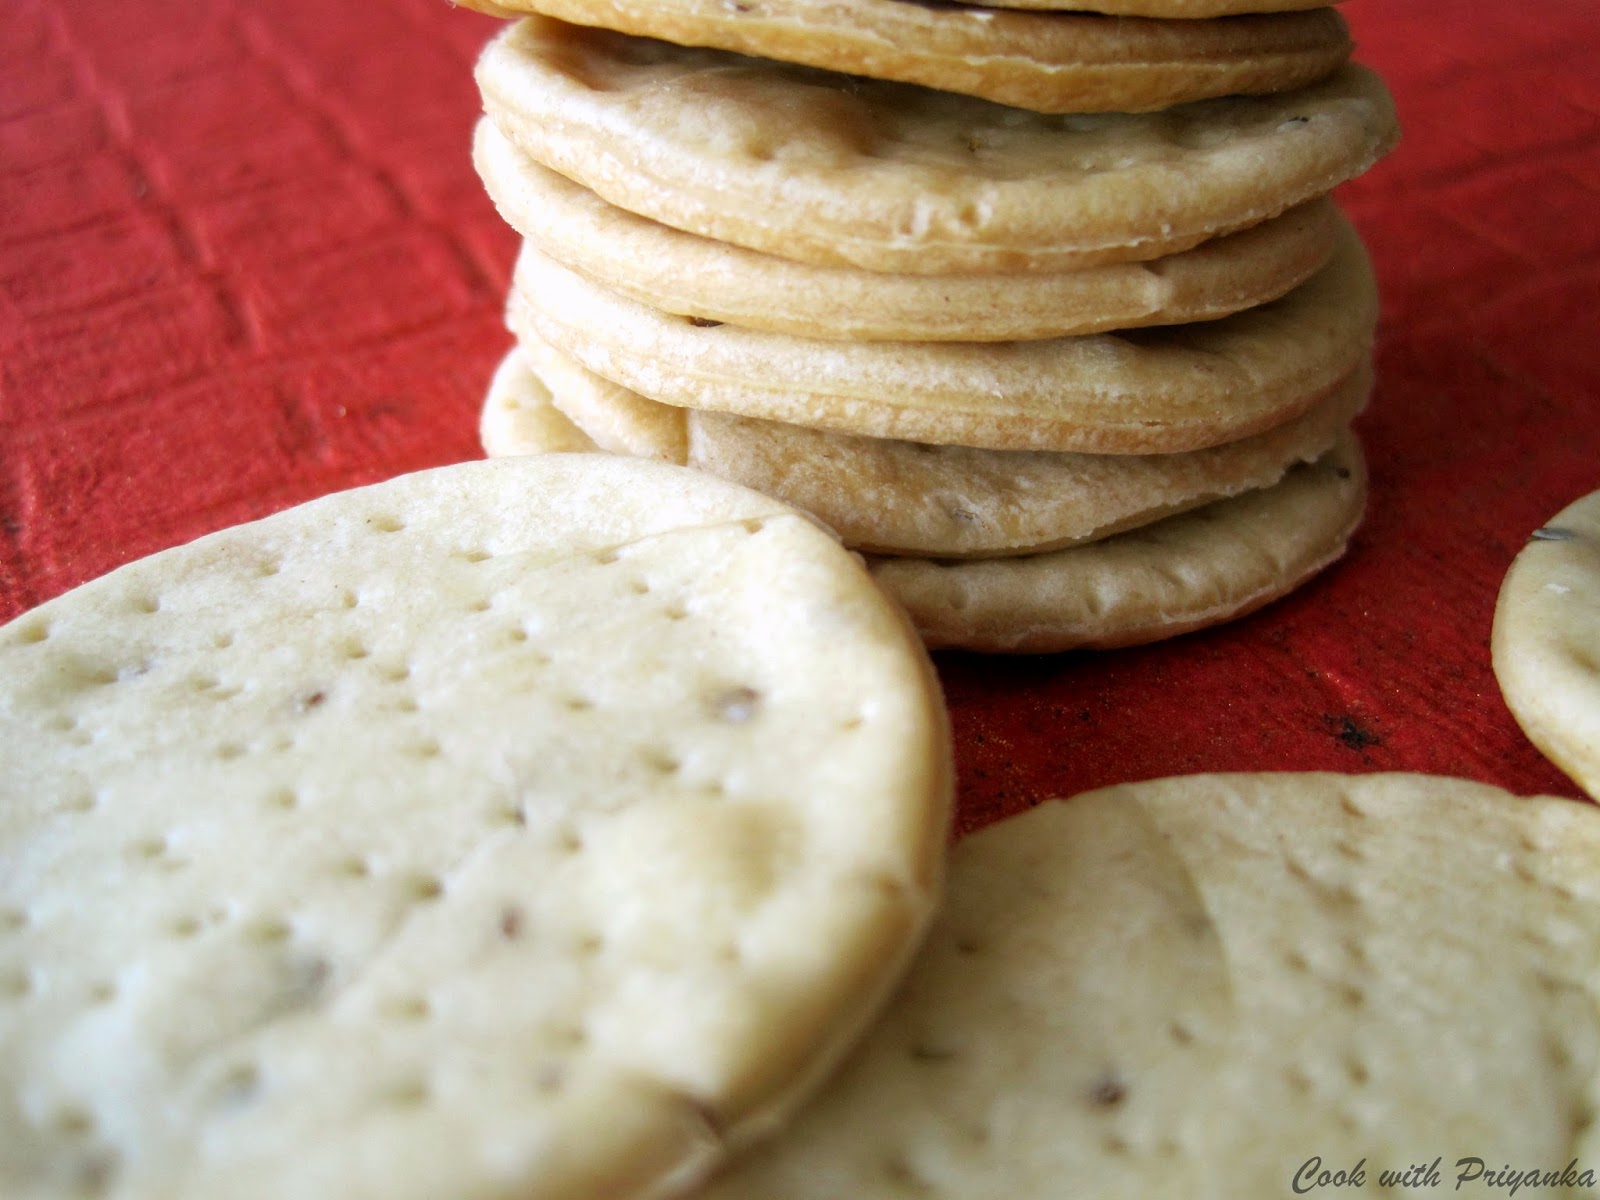
Baked Papdi/Baked crackers

These days I am on a mission of healthy snacks which have a longer shelf life and can be enjoyed guilt free. In our Indian homes, the most famous snacks are mathri, but........they have huge amount of ghee in it :((((, I can't even imagine the number of calories they have!!!!!. But at the same time they are so so addictive that one can't resist to have just one :))).  This is human tendency I believe, the food which is unhealthy is loved most and we always don't prefer healthy ones :). One fine day we friends were discussing about the same on a group chat, found that most of the people have green tea but just as a sake to have it and never preferred it above their proper Indian ginger tea :))). But at the same time there are many more who love to have it, I am among them.

I have a habit of munching something after every 2-3 three hours, need some biscuits, flakes or anything. If I have anything which is high in calories and have high fat content, then I am gone. So therefore I planned to have healthy snacks with full of flavours. Sushant's colleagues demanded for some Indian samosas (proper aloo one). So I prepared in a very large batch and was left with some dough. My mother always used to fry mathris from the left over dough and I am sure you all too do the same thing :)))). But I gave a new twist to it and just baked them and voila the results were outstanding - crisp, crunchy and light. Goes amazingly good with a cup of tea. As it was from the samosa dough hence made from Maida/ All purpose flour, but next batch I will prepare from whole wheat flour and soon share the results. So here is the recipe, its quite simple and easy to prepare, hope you all will like it too.

Ingredients :
  • All purpose flour - 1 cup
  • Vegetable oil - 2 tbsps (I used Olive oil)
  • Carom seeds/Ajwain - 1 tsp
  • Salt as per the taste
  • Warm water - 1/4 cup (to knead the dough)

Method :
  • Mix all the ingredients (except water) in a big bowl. 
  • Now add little by little water, we need to have a stiff dough (not very soft). You can always adjust the amount of water. Once done cover and allow it to rest for 30 minutes.
  • Now divide the dough into two parts and roll like thin chapati. With the help of a cookie cutter or a bottle's cap cut into desire shape. Place them on baking tray, lined with butter paper/aluminum foil.
  • Bake them on the middle rack at 180 ° C for about 18-20 minutes, do flip them in between. Mine were done in exactly 20 minutes but every oven varies in terms of power hence would advise to keep an eye.
  • Also if u want dark brown color, then put them on broil (on the top rack with temperature 220 ° C) for just 30 sec. But make sure that you don't move from there as they might burn.
  • Take them out from the oven, let them rest in baking tray for 5 minutes and then transfer on to a cooling rack. Once completely cooled store them in an air tight jars. These will remain good for a month.
  • Now prepare a nice cup of tea and have them with a cute smile :)
Note : You can add flavours of your own choice like - chili flakes, kasuri methi/Dried fenugreek leaves, Italian herbs too if you like :)


Do share your experiences and feedback with me in the below section of comments or on my Facebook page. I too have a You Tube channel please do visit for all the video recipes. All the links mentioned below :)


Enjoy making them :)

Thanks & Happy Baking
Priyanka :)


Friday, 2 May 2014

Quick Roasted Murmure/ Laiya/Lava - Low cal (Roasted Puffed Rice)


It was raining here in London since morning and I was craving for some adrak wali chai (Ginger Tea), I love it and can have 4-5 cups in a day, though I have started controlling my tea and switched to green tea more :))). 


We always have some snacks with evening tea, I am sure you all too. Usually in my Native Town, we all sit together and have evening tea with lots of fried snacks and no one is worried about the weight gain at all. I still remember during my schooling whenever I had my exams, mummy used to make a big dabba of murmure namkeen. She used to roast it in batches with lots of oil. I loved it and had it in huge quantities, later realized the unhealthy part. After marriage I started roasting them in a nonstick pan with no oil, but the results were not that good. Then one day I made this namkeen in microwave and voila the results were just mind blowing. My mother didn't realize that they were made in 1 tsp of oil (that too for only tadka/tampering). Its supereasy and quick to make too. I also prepare flattened rice/chivra namkeen almost in the same manner and pretty sure that you all will love it :))).
Here is the link for roasted chivra namkeen - Click here

Ingredients :
  • Laiyya/Murmure/Puffed rice - 2 cups
  • Peanuts - 3/4 cup
  • Turmeric powder - 1/2 tsp
  • Black salt - 1 tsp
  • Green chilies - 3 medium sized (finally chopped)
  • Curry leaves - 15 (appx)
  • Sugar - 1 tsp (optional)
  • Salt - if needed (I didn't add)
  • Oil - 1 tsp
Method:
  • Take a microwavable big bowl, dry roast murmure in microwave for 2-3 minutes on high (do stir twice in between) and keep aside. Following the same procedure roast peanuts also for a couple of minutes or unless nicely done.
  • In the same bowl, heat oil for 2 minutes in microwave. Now add curry leaves, green chilies turmeric powder, mix well and again microwave it for a min.
  • Finally add black salt and sugar, mix (If you are adding plain salt, add at this point of time)
  • Now add roasted peanuts and murmure, mix very well.
  • Cool the mixture completely and store it in an airtight container for a month and enjoy with tea, coffee or cold drink. But I am sure it won't last for such long :)))
Note : 
  • You can add some dry fruits like coconut, raisins, almonds etc.
  • Adjust the quantity of peanuts, green chilies & salt as per the taste. You can also add red chili powder while tampering, and omit green chilies.
Do share your experiences and feedback with me in the below section of comments or on my Facebook page. I too have a You Tube channel please do visit for all the video recipes. All the links mentioned below :)


Thanks & Happy Healthy Cooking
Priyanka :)))